The Sheaffer Snorkel:
The Technical Side
by Nathan Tardiff
|
The Sheaffer Snorkel: by Nathan Tardiff |
|
Rare Snorkels
My experience with snorkels has found some of the following examples to be extremely hard to find or at least
very uncommon. Sheaffer made the following snorkels which I have seen or owned at one point or another in
the past (I am
not mentioning colored models - leaving that to Bill): an all stainless steel model with no pattern, one in steel
with a striped pattern similar to that found on the much more common standard all gold filled models, one in chrome
with the same pattern, and one with a lustraloy patina. The steel models are VERY rare. There
are also all sterling silver models which seem to be a bit more common than steel (though also extremely rare)
as more collectors seem to have examples or have seen them. Lastly there are prototypes or very limited production
runs involving design instead of just material.
One Australian model has a plastic spring and sac protector tube - and is very hard to find...and a Canadian
model used stainless steel springs. A saratoga model made in the US and obtained from a fellow with access
to the Sheaffer archives
had an extremely flexible 14K white gold nib and a snorkel tube double the standard thickness and a feed that was
also longer than the average. White gold on a snorkel is a prize when you find it so marked...so look carefully
at those snorkel nibs that you might think are palladium - they might be marked 14K. Palladium is more valued
than gold on the market today HOWEVER when marked 14K and thus white gold it is the rarity of such a snorkel that
makes it worth more - not merely the precious metal content. Lastly...of the rare snorkels there is
a Canadian demonstrator model that was made with a clear
cap...which may not seem too important until one notes that the metal inner cap was also clear plastic which is
normally not the case.
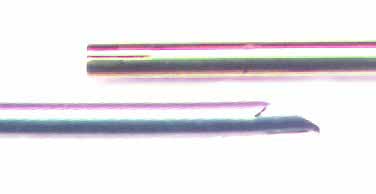 |
Snorkel tubes These were made in gold tone and steel with one odd example being marked on the feed side with very small letters "14K Sheaffer'S". If you include Canadian models there were four angle cuts at the end of the snorkel tube. In the US there is the 90 degree cut on the standard saratoga model and the much sharper cut on the triumph models. In Canada many saratoga models were made with a 30 to 45 degree cut which sets flush with the feed when withdrawn. Now and then the Canadian triumph nibbed snorkels have sharper angles than the US versions - normally found on pens with deep seated palladium triumph nibs. |
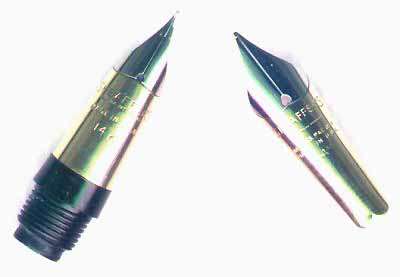
Nibs
The snorkel was made with two tone and single tone nibs with just about any style point one can think of including
music style nibs on both saratoga and triumph models. The gold and the iridium are more or less consistent
throughout all nib types with some variations due to nibs that were made very flexible or very firm. To my
knowledge there were no 18K snorkel nibs - all are 14K if gold. Palladium nibs are much less
consistent. Several samples were tested for content and were found to contain silver, gold and palladium
with trace amounts of other metals. Those nibs marked "palladium silver" were found to have a greater
silver content and those unmarked ranged from approx. 35%-40% to as much as approx. 95% palladium content.
| There seems to be no way to tell content except by having the nib tested by a jeweler as the nibs are not marked
for content. What is known is that the platinum sister metals do improve ink flow - one of the reasons for
two tone nibs in the first place (Parker tried to have a two tone duofold nib but was later forced to drop the
idea soon after a few examples were produced...as Sheaffer had patent rights...back in the 30's Sheaffer used platinum
about the nib slit where it mattered...and Parker used Rhodium where it did not!). Though some may disagree,
the companies themselves have found such plating and/or additions to nib alloys from the platinum sister metals
such as palladium to be beneficial in appearance, flow, and durability. The palladium nibs Sheaffer made
for this pen and its state of the art filling mechanism remain the only nibs ever made with such high palladium content (14K gold afterall is only 7/12ths pure gold). Pure platinum and platinum alloy nibs are to be found in Japan by Sailor/Pilot, however. |
 |
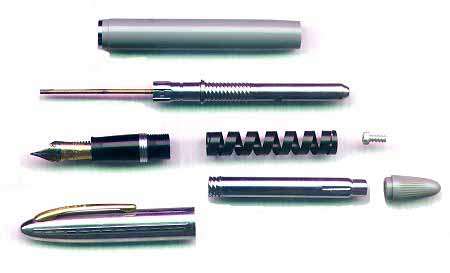
The pen itself, parts, and how to disassemble
White Dot
At the top is the white dot (on some models) and this consists of a white plastic plug that is friction fit into
a round hole in the cap plastic. If it is chipped or cracked/crazed/discolored it is possible to remove it
by gently rocking it up and out of the recess with a sharp and thin blade set under the edge - working from side
to side. Be very careful not to cut right through the dot...merely use the blade to grip the old dot.
Some people simply drill them out and replace them after injecting a little rubber cement or grease into the chamber
to keep the remains of the old dot from rattling about in the cap top - this is perhaps the easiest method.
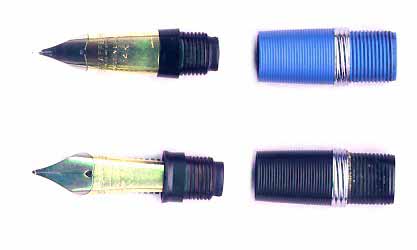
Inner Cap and Clip
All models have the spring clip. The clip itself (normally gold filled or gold, sometimes chrome, rarely
steel or sterling) has a closed off grip which holds the small spring that enables the clip to move out and then
to snap back....a feature that better enables the snorkel to safely handle thick fabric pockets without ever having
a sprung clip. Now and then the spring has
been worn out or has rusted away and cracked over time for any number of reasons and thus must be replaced.
In order to get at the inside and remove the old spring to replace it with a new one the metal cap liner/inner
cap must be removed. Some people use hot water to get the sealant that holds in this metal inner cap to soften
and enable it to be removed. Others use heat guns or flame.
I find that these methods often heat the plastic too much before they get to heating the sealant enough for removal. If one heats the cap from the inside - better results at removal are possible with less risk of damage to the cap plastic through warping or discoloration (as with hot water which often makes the color dull/white/or foggy). This can be done by pouring hot water into the cap - which sometimes works as it evenly heats up the metal....but often the heat dissipates too rapidly and the sealant is not softened enough for removal. Thus I developed a method/device to deal with these pesky metal inner caps. It simply consists of a spring mounted steel rod with another piece of steel around this. In the center is a plastic or rubber buffer between the steel parts. The spring mounted rod is pushed into the cap and turned so that its slightly abrasive tip can get a good contact with the end of the inner cap through any debris that is often there. The metal thread ring around the rod is then screwed into the cap as one would screw in a normal section/barrel. Finally a low electric current is turned on and allowed to flow through the inner cap from front to rear for a while - evenly heating it up through the metal just under the coat of sealent. Thus the inner cap can be removed without damage to the cap plastic. For the first time ever and only on Stylophiles is this description of a tool for the removal of metal inner caps/cap liners for Sheaffer TM and Snorkel pens as well as PFM's and Imperials available!
Once the inner cap has been removed one can use a dental pick to pull out the clip spring by gripping its wings
that rest against the inside wall of the cap. Then to install a new spring - simply line it up with the clip
mount and push it in until it snaps in place....be sure the wings are on the side of the cap wall.
Then simply clean off the old adhesive from the metal inner cap and apply a coat of rubber cement - then replace
the inner cap. The rubber cement will enable the next person who repairs the cap sometime in the next 30
years or so to be able to remove the inner cap without causing permanent damage that would be possible with other
adhesives. Remember that a ball pen lasts about as long as its cartridge in most cases....but a fountain
pen such as a snorkel can outlast thousands of ball pens and become a family heirloom (so keep in mind the next
generation). Above all....do not use super glue to remount a metal inner cap.
 |
Nib and Nib Mount With saratoga models the nib and feed are friction fit into the nib mount which screws onto the section. With triumph models the nib is screwed onto the nib mount with fine threads and the feed is turned to the proper position using a flat head screw driver. Below the nib mount is a small chamber in the section that contains the section gasket...in most cases these should be replaced or the pen will not be able to develop enough compression on the downstroke to drive the air from the sac so that it can fully fill with ink when the pressure is released. The section gasket surrounds the snorkel tube and prevents any ink from entering the delicate chamber with its rust prone metal parts. |
It is a vital part of the pen. If air leaks out of the outer feed instead of the snorkel tube then your
pen needs a new section gasket. These section gaskets are available for about 50 cents in California (hand
made) and for 40 cents in Massachusetts (manufactured).
| Section Next is the section thread ring... These need replacement now and then but in most cases can be left as is. The metal thread ring is the part that holds the cap in place when screwed on. It is friction fit and has gear teeth inside to grip the section and avoid slipping around. These are replaced by gently pushing them off the rear of the section, removing...and slipping a new one on toward the front of the section. Rather simple and self-explanatory when you have a snorkel in front of you. After the thread ring is a smaller metal ring that protects the fragile barrel lip...it is not needed for the function of the pen - but it should be there if the pen is to have a long life as it prevents cracks and wear of the thin plastic at that end of the barrel |
 |
The section itself unscrews and in most cases a simply rubber grip is all that is needed for removal.
Now and then a soak in water and a gentle application of heat is needed for the removal of a stubborn section.
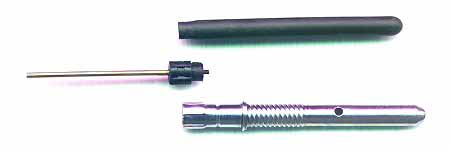 |
Sac Protector/Snorkel Tube The next parts are the sac/sac protector tube/bushing/snorkel tube....these all should come out of the pen as one unit. The snorkel tube is metal with a hard rubber feed that is very thin and lines the inside of the metal tube. Without this thin hard rubber liner the pen will not work...it also MUST extend a few mm from the ink chamber side to facilitate the exchange of air and ink during writing. |
The snorkel tube is set into the bushing which is lined up with 4 side mounts to fit into the sac protector
tube (a tube with a spiral for the forward and reverse movement of the snorkel...as well as three air vents for
the compression-decompression of the sac with air pressure, and the spring mount)...at the end of the bushing
you should see the inner feed of the snorkel tube exposed a bit beyond the sac nipple of the bushing.
Note that the snorkel tube MUST be positioned so that the feed slit at the end is directly under the feed slit
of the outer feed which is below the nib....otherwise the ink will have troubles flowing at all. Also, the
snorkel tube should be fitted into the bushing with a very small coat of shellac about the end of the metal (NOT
the hard rubber inner feed!!!) to form a good seal and grip. To remove bushings - open up the end metal of
the protector tube which is normally bent slightly over the bushing - and screw in a very thin threaded hook or
dental tool that is just wide enough to grip the center of the bushing - and gently rock/pull out.
The sac is put over the bushing nipple with a small application of shellac sealant...be sure to keep this away
from the center/feed. The sac and bushing are put into the sac protector tube....be sure the tube has every
remnant of the old sac cleaned away or the new sac will not fit properly and the ink capacity will be reduced as
a result.
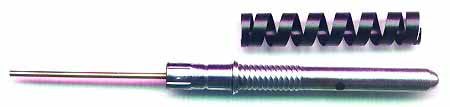 |
Spring Next in line is the thin spring that enables the snorkel to extend when the end cap is unscrewed....this should be free of rust and lubricated with silicone grease and set into the sac protector tube spring mount (a ring found at the end of the threaded area). |
Barrel/Filler Tube
The end of the pen has two more seals to be replaced...the end cap gasket and the o-ring seal. The snorkel
is an advanced form of Sheaffer's touchdown filling system. When the filler tube is "touched down"
a pressure is created in the barrel to compress the sac. At the end of the downstroke a grove in the tube
releases the pressure and enables the pen to fill with ink as the sac returns to its normal/uncompressed position.
The o-ring enables the filler tube to do this. Most o-rings that are 30+ years old must be replaced
in order for the pen to function. A long and thin flat head screw driver is needed to unscrew the end cap
from the filler tube inside the barrel. A small screw will come out after this is done and the end cap will
be loose enough to be removed. Inside the end cap is a small rubber ring seat or gasket that seals off
the metal filler tube at the end...in some cases this needs to be replaced or air will leak out the end cap and
cause incomplete fillings.
 |
However, before this is done push the filler tube inside the barrel until it is out - note how the threads on the
end of the tube match those on the sac protector tube. Then take a dental pick and remove the old o-ring
from the seat just inside the end of the barrel. Next, gently work a new o-ring into the seat. These
cost 38 cents each in Massachusetts and 50 cents each in California (prices are the same for both the larger PFM o-rings and the standard snorkel/touchdown o-rings). Take the filler tube and put the screw through the end....you may want to use the screw driver to guide it into place. Apply some silicone grease about the filler tube and slip it down the barrel and out through the end and new o-ring seal. |
Put the new gasket over the screw and apply a small amount of rubber cement....then screw it back into the end
cap. Now the entire pen cam be reassembled to work like new....be sure to lubricate the barrel side of the
snorkel tube(!! don't get any silicone grease on the tube at the feed side or it will hinder ink flow as it is
water repellent!!), the sac protector and spring...as well as the filler tube with silicone grease.
|
So, this is what Bill Hong and Nathan Tardiff had to say about the Snorkel in their Stylophile'S article. Both
their experiences, especially Nathan's, meet my own in most cases. I have found Sheaffer Snorkel pens as extremely
dependable and useful writers in many office work situations. A Snorkel uses its limited ink reservoir (which holds
about the same amount of ink like a standard cartridge) much better and more economical than conventional fountain
pens. This is due to their relatively air tight packing around the ink reservoir, so less ink evaporation will
take place. Also the exact, even, but economic ink flow helps. And then the fact, that you will find only one Snorkel
with a broad nib under 100 with fine nibs - the broader the nib, the more ink is used during writng. The nibs are
- typical for Sheaffer - stiff and not flexible at all. But the conscientious production/treatment of the nib and
the iridium tip plus the Palladium plating of the nib slit let these nibs glide Further notes, additions, corrections and questions are welcome. Det Baumann Stylophile'S magazin is found under Stylophile's Online Magazin
|